Deploying an app to AKS using Azure DevOps & Azure Cloud Shell

𝑪𝒍𝒐𝒖𝒅 𝒂𝒏𝒅 𝑫𝒆𝒗𝑶𝒑𝒔 𝑻𝒆𝒄𝒉 𝑪𝒐𝒎𝒎𝒖𝒏𝒊𝒕𝒚 || 𝑷𝒓𝒐𝑫𝒆𝒗𝑶𝒑𝒔𝑮𝒖𝒚 🤖 https://t.me/prodevopsguy 👋 Hi there! We are ProDevOpsGuy, a passionate DevOps enthusiast Tech Community with a strong belief in the power of automation and collaboration to drive innovation. 🚀 I thrive in bridging the gap between development and operations, creating seamless and efficient software delivery pipelines. My journey in the world of DevOps has allowed me to blend my technical skills with a knack for problem-solving, enabling me to contribute effectively to agile and dynamic environments. 💡 With a keen interest in continuous integration, continuous delivery (CI/CD), containerization, and orchestration, I've had the privilege to explore cutting-edge technologies like Docker, Kubernetes, Jenkins, and Ansible. I find joy in designing scalable and resilient infrastructures that enable teams to deploy applications faster and with greater confidence. 🌐 Beyond the tech realm, I'm an advocate for DevOps culture, emphasizing collaboration, communication, and a relentless pursuit of improvement. I'm always eager to connect with fellow professionals, exchange insights, and explore opportunities to collaborate on exciting projects. 📚 When I'm not tinkering with the latest DevOps tools, you can find me indulging in books on technology trends, hiking to rejuvenate, and occasionally experimenting with new coding challenges. 🌟 Let's connect! Whether you're looking to discuss DevOps methodologies, explore partnership opportunities, or simply share experiences, feel free to reach out. I'm excited to be part of the DevOps journey, driving excellence together.
Prerequisites
Access to an Azure Account
Access to Azure DevOps and PAT Token
Access to a GitHub Account
Create an Azure DevOps Organization. Head here & click the “Create a new organization” button.
All of the following commands should be run in Azure Cloud Shell. Access the shell here from any browser and logging into your Azure account.
You can use the PowerShell screen, but in this walkthrough I use Bash. Type “bash” in the terminal to switch to bash commands.
Overall Architecture
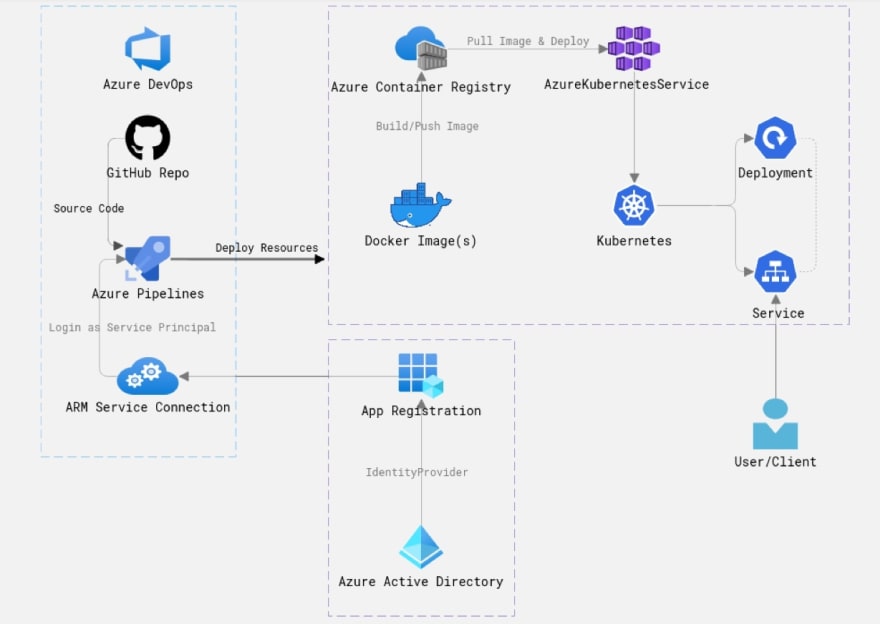
I used Cloud Skew to create the above diagram. Highly recommend you check it out (It's FREE).
Azure DevOps & GitHub are great, easy to use SaaS products - GitHub and Azure Pipelines will help you to achieve your source control and CI/CD needs. The source code is in a Git repository in GitHub (your application, infrastructure, and pipeline code), and your CI/CD pipeline is an Azure YAML Pipeline.
Azure Container Registry (ACR) is an Azure-native container registry, much like Docker Hub but it’s Azure’s container registry solution, so it integrates with other Azure resources and uses Azure Active Directory for added security. The Azure Pipeline in this demo is building and pushing the Docker image to the ACR (a new version of the image is created on every successful run of the pipeline execution).
Azure Kubernetes Service (AKS) is a serverless, managed container orchestration service. AKS runs directly on Azure as a PaaS service and provides you with a Kubernetes environment to deploy and manage your containerized Docker application. This managed Kubernetes environment is what runs your Kubernetes resources in this demo.
Azure Active Directory is the built-in Azure identity management solution. In this demo, it is important for you because you need a Service Principal (an identity based on an Azure AD App Registration). This Service Principal is used to create a secure, identity-based authenticated connection (a Service Connection to the Azure Resource Manager) so you can deploy the resources with the correct permissions to the correct Azure Subscription.
Initial Setup
- Add the Azure DevOps extension to your cloud shell session:
az extension add --name azure-devops
- Add context for your shell to reference your DevOps organization:
az devops configure --defaults organization=https://dev.azure.com/insertorgnamehere/
- Set the AZURE_DEVOPS_EXT_PAT environment variable at the process level. Now run any command without having to sign in explicitly:
export AZURE_DEVOPS_EXT_PAT=insertyourpattokenhere
- Create a new Azure DevOps project:
az devops project create --name k8s-project
- Set the default project to work with:
az devops configure --defaults project=k8s-project
Deploying the Infrastructure
- Create a resource group to logically organize the Azure resources you will be creating:
az group create --location westeurope --resource-group my-aks-rg
- Create a service principal. Your AKS cluster will use this service principal to access the Azure Container Registry and pull container images.
IMPORTANT: Copy the output of the following command, you will need it later:
az ad sp create-for-rbac --skip-assignment
- Create an AKS cluster to deploy your app into (this is where you use the output from the previous command)
IMPORTANT: Sometimes you will get an error like "400 Client Error: Bad Request for url" - It is a known issue & re-running the command again usually works:
az role assignment create fails in Cloud Shell: 400 Client Error: Bad Request for url: http://localhost:50342/oauth2/token #9345
az aks create -g my-aks-rg -n myakscluster -c 1 --generate-ssh-keys --service-principal "insertappidhere" --client-secret "insertpasswordhere"
- Create an Azure Container Registry (ACR). This will be the repository for our containers used in AKS:
az acr create -g my-aks-rg -n insertuniqueacrnamehere --sku Basic --admin-enabled true
- To allow AKS to pull images from ACR, we must set our Azure RBAC permissions for the service principal:
ACR_ID=$(az acr show --name ghostauacr --resource-group my-aks-rg --query "id" --output tsv)

CLIENT_ID=$(az aks show -g my-aks-rg -n myakscluster --query "servicePrincipalProfile.clientId" --output tsv)

az role assignment create --assignee $CLIENT_ID --role acrpull --scope $ACR_ID
Deploying the Application
Fork this GitHub repo (open this link in a new tab and click "fork"):
ghostinthewires / k8s-application
Now clone it to the terminal session within cloud shell:
git clone https://github.com/<your-github-username-goes-here>/k8s-application.git

cd k8s-application
- Create a pipeline in Azure DevOps:
az pipelines create --name "k8s-application-pipeline"
- Follow the prompts in your terminal to set up the pipeline:
Enter your GitHub username; press enter
Enter your GitHub password; press enter
Confirm by entering your GitHub password again; press enter
(If Enabled) Enter your two factor authentication code
Enter a service connection name (e.g. k8sapplicationpipeline); press enter
Choose [3] to deploy to Azure Kubernetes Service; press enter
Select the k8s cluster you just created; press enter
Choose [2] for the “default” Kubernetes namespace; press enter
Select the ACR you just created; press enter
Enter a value for image name (press enter to accept the default); press enter
Enter a value for the service port (press enter to accept the default); press enter
Enter a value for enable review app flow for pull requests (press enter without typing a value)
Choose [1] to continue with generated YAML; press enter
Choose [1] to commit directly to the master branch; press enter
CONGRATULATIONS!
You have created an Azure DevOps Project! Wait a few minutes for the container to build, push to ACR, then deploy to AKS.
- Access your AKS cluster by getting the kubeconfig credentials:
az aks get-credentials --resource-group my-aks-rg --name myakscluster
- View the Kubernetes resources your project has created:
kubectl get all

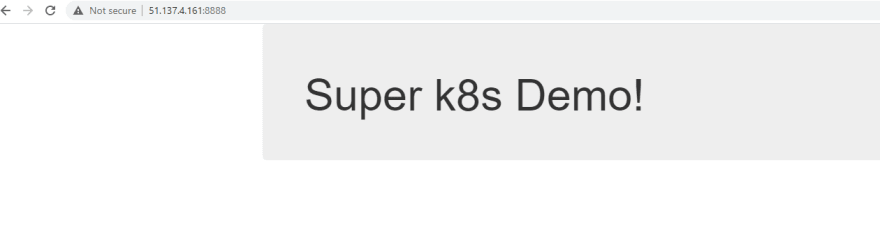
- Copy the service IP address (under “External IP”) and paste into a new browser tab with ":8888" (e.g. 51.137.4.161:8888) on to the end.
This should be your final result!
Summary
In a relatively short period of time, you have created a new project in Azure DevOps. Within that project, you have set up a CI/CD pipeline. That pipeline built your application inside of a container, pushed that container to a container repository, and deployed the container to AKS. Finally allowing you to view your web application running in AKS from the web via a Kubernetes service. You are amazing, well done!
IMPORTANT: Head back over to your forked repo and check out the file "azure-pipelines.yml". You should see the line "trigger: – master" which means every time we make a change to the master branch, a new build will kick off automatically. Magic!
Now that you have a fully working application deployed to AKS, I bet you can't wait to dive in and see how it all works under the hood.