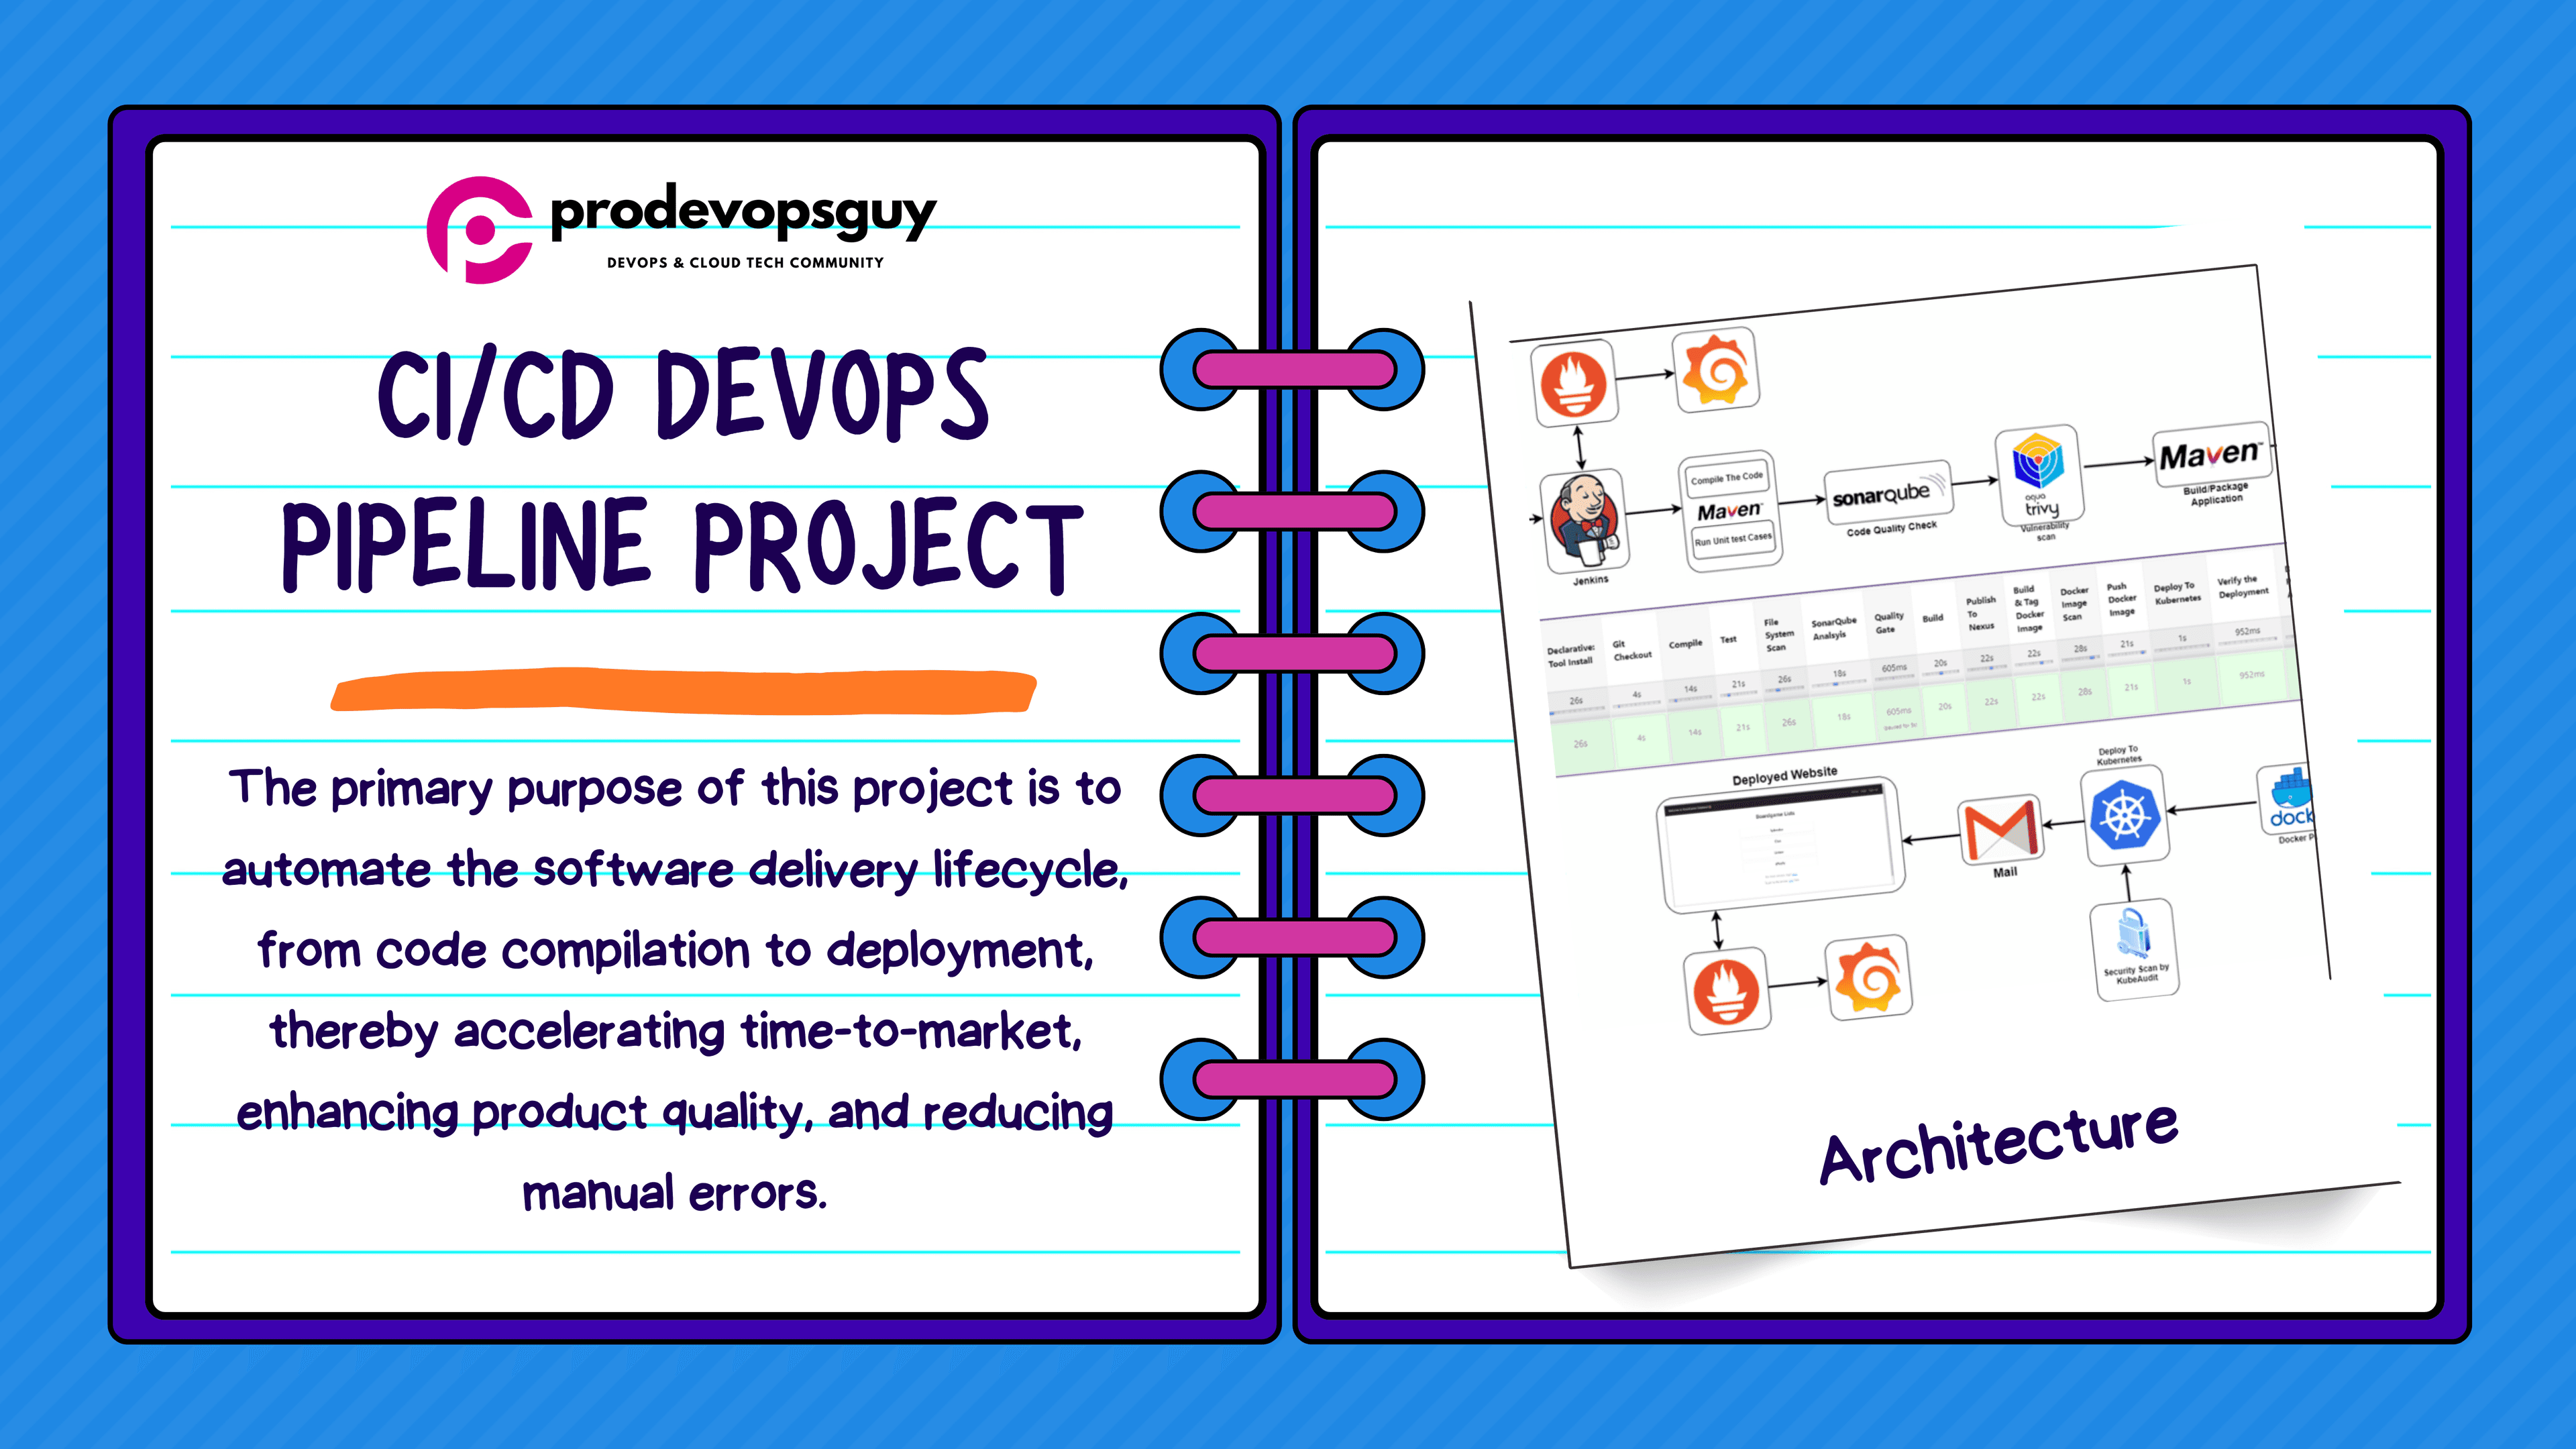

Deploying a Python App built with (Flask and psutil) to ECR and Kubernetes
𝑪𝒍𝒐𝒖𝒅 𝒂𝒏𝒅 𝑫𝒆𝒗𝑶𝒑𝒔 𝑻𝒆𝒄𝒉 𝑪𝒐𝒎𝒎𝒖𝒏𝒊𝒕𝒚 || 𝑷𝒓𝒐𝑫𝒆𝒗𝑶𝒑𝒔𝑮𝒖𝒚 🤖 https://t.me/prodevopsguy 👋 Hi there! We are ProDevOpsGuy, a passionate DevOps enthusiast Tech Community with a strong belief in the power of automation and collaboration to drive innovation. 🚀 I thrive in bridging the gap between development and operations, creating seamless and efficient software delivery pipelines. My journey in the world of DevOps has allowed me to blend my technical skills with a knack for problem-solving, enabling me to contribute effectively to agile and dynamic environments. 💡 With a keen interest in continuous integration, continuous delivery (CI/CD), containerization, and orchestration, I've had the privilege to explore cutting-edge technologies like Docker, Kubernetes, Jenkins, and Ansible. I find joy in designing scalable and resilient infrastructures that enable teams to deploy applications faster and with greater confidence. 🌐 Beyond the tech realm, I'm an advocate for DevOps culture, emphasizing collaboration, communication, and a relentless pursuit of improvement. I'm always eager to connect with fellow professionals, exchange insights, and explore opportunities to collaborate on exciting projects. 📚 When I'm not tinkering with the latest DevOps tools, you can find me indulging in books on technology trends, hiking to rejuvenate, and occasionally experimenting with new coding challenges. 🌟 Let's connect! Whether you're looking to discuss DevOps methodologies, explore partnership opportunities, or simply share experiences, feel free to reach out. I'm excited to be part of the DevOps journey, driving excellence together.
Cloud-Native-Monitoring-App
GITHUB LINK
This is a monitoring app built with Python, and it would be containerized with Docker and deployed to AWS EKS (Amazon Elastic Kubernetes Service).
Acquire
Learn Docker and How to containerize a Python application
Creating Dockerfile
Building DockerImage
Running Docker Container
Docker Commands
Create an ECR repository using Python Boto3 and push Docker Image to ECR
Learn Kubernetes and Create EKS cluster and Node groups
Create Kubernetes Deployments and Services using Python!
STEP 1 — Installations of Services on your WorkStation
Install AWS CLI, then Go to your AWS account and get your secret keys, and configure the workspace
aws configureInstall Python on your workstation and a Python extension in vscode
The application uses the `psutil` and `Flask`, Plotly, boto3 libraries. Install them using pip
pip3 install -r requirements.txtInstall dependencies psutil
pip3 install psutiland flaskpip install flaskInstall Python for ECR SDK
pip install boto3Install Kubernetes, add the K8S python dependencies client library
pip install Kubernetesand the extension of Kubernetes in vscodeInstall the docker extension in vscode
Step 2: Run the application
Create requirement.txt file then Install them using pip pip3 install -r requirements.txt
Flask==2.2.3
MarkupSafe==2.1.2
Werkzeug==2.2.3
itsdangerous==2.1.2
psutil==5.8.0
plotly==5.5.0
tenacity==8.0.1
boto3==1.9.148
kubernetes==10.0.1
To run the application, navigate to the root directory of the project and execute the following command:
$ python3 app.py
This will start the Flask server on `localhost:5000`. Navigate to http://localhost:5000/ on your browser to access the application.
Step 3: Dockerizing the Flask application
- Create a
Dockerfilein the root directory of the project with the following contents:
# Use the official Python image as the base image
FROM python:3.9-slim-buster

# Set the working directory in the container
WORKDIR /app

# Copy the requirements file to the working directory
COPY requirements.txt .

RUN pip3 install --no-cache-dir -r requirements.txt

# Copy the application code to the working directory
COPY . .

# Set the environment variables for the Flask app
ENV FLASK_RUN_HOST=0.0.0.0

# Expose the port on which the Flask app will run
EXPOSE 5000

# Start the Flask app when the container is run
CMD ["flask", "run"]
- Build the Docker image, and execute the following command:
$ docker build -t <image_name> .
- Run the Docker container, and execute the following command:
$ docker run -p 5000:5000 <image_name>
This will start the Flask server in a Docker container on localhost:5000. Navigate to http://localhost:5000/ on your browser to access the application.
Step 4 — Pushing the Docker image to ECR
Create an ECR repository using Python in a folder
ecr.py:Configure the ECR repository to your workspace to enable a push, you will find the process in the console view push commands
import boto3

# Create an ECR client
ecr_client = boto3.client('ecr')

# Create a new ECR repository
repository_name = 'my-ecr-repo'
response = ecr_client.create_repository(repositoryName=repository_name)

# Print the repository URI
repository_uri = response['repository']['repositoryUri']
print(repository_uri)
Then run this python3 ecr.py
- Push the Docker image to ECR using the push commands on the console:
$ docker push <ecr_repo_uri>:<tag>
Step 5 — Creating an EKS cluster and deploying the app using Python
Create an EKS cluster
cloud-native-clusterand add a node group in the AWS consoleCreate a node group
nodesin the EKS cluster.Create deployment and service in a folder
eks.py
from kubernetes import client, config

# Load Kubernetes configuration
config.load_kube_config()

# Create a Kubernetes API client
api_client = client.ApiClient()

# Define the deployment
deployment = client.V1Deployment(
    metadata=client.V1ObjectMeta(name="my-flask-app"),
    spec=client.V1DeploymentSpec(
        replicas=1,
        selector=client.V1LabelSelector(
            match_labels={"app": "my-flask-app"}
        ),
        template=client.V1PodTemplateSpec(
            metadata=client.V1ObjectMeta(
                labels={"app": "my-flask-app"}
            ),
            spec=client.V1PodSpec(
                containers=[
                    client.V1Container(
                        name="my-flask-container",
                        image="568373317874.dkr.ecr.us-east-1.amazonaws.com/my-cloud-native-repo:latest",
                        ports=[client.V1ContainerPort(container_port=5000)]
                    )
                ]
            )
        )
    )
)

# This is an automation to run deployment and svc using python
# Create the deployment
api_instance = client.AppsV1Api(api_client)
api_instance.create_namespaced_deployment(
    namespace="default",
    body=deployment
)

# Define the service
service = client.V1Service(
    metadata=client.V1ObjectMeta(name="my-flask-service"),
    spec=client.V1ServiceSpec(
        selector={"app": "my-flask-app"},
        ports=[client.V1ServicePort(port=5000)]
    )
)

# Create the service
api_instance = client.CoreV1Api(api_client)
api_instance.create_namespaced_service(
    namespace="default",
    body=service
)
- make sure to edit the name of the image on line 25 with your image Url.
To run the K8s commands for deployment and service instead of adding the python script you create
deployment.yml and service.ymluse these commands `kubectl apply -f deployment.yml` and `kubectl apply -f service.yml`
- Configure the AWS EKS to your workspace
aws eks update-kubeconfig - name cloud-native-cluster
Once you run this file by running
python3eks.pydeployment and service will be created.Check by running the following commands:
kubectl get deployment -n default (check deployments)
kubectl get service -n default (check service)
kubectl get pods <name of pod> -n default (to check the pods)

#edit images created if u made errors
kubectl edit deployment my-flask-app -n default

#this will pull down the editted image
kubectl get pod -n default -w
Once your pod is up and running, run the port-forward to expose the service
kubectl port-forward service/<service_name> 5000:5000
⭐ Your app should be live. ⭐
✍️ Author by Harshhaa.